Ever wondered how to mill a live edge slab? It’s a rewarding process that transforms raw logs into stunning pieces of wood, perfect for furniture or decor. Whether you’re a DIY enthusiast or just curious, understanding the steps involved can help you appreciate the craftsmanship behind these unique slabs. Let’s break it down into simple steps, so you know exactly what’s involved.
Key Takeaways
Milling a live edge slab starts with choosing the right log based on size, grain, and condition.
You’ll need essential tools like a chainsaw, a slab mill or portable sawmill, and proper safety gear.
The process involves preparation, setting up equipment, and making precise cuts to achieve the desired slab thickness.
Drying and curing the slab is a crucial step to prevent warping and ensure durability.
Proper sanding and finishing bring out the natural beauty of the wood, making it ready for use.
Introduction to Live Edge Slab Milling
Live edge slab milling is a fascinating woodworking process that combines craftsmanship and nature. This technique allows woodworkers to preserve the natural edges of a tree, showcasing its raw beauty and unique contours. Whether you’re a seasoned craftsman or a curious DIY enthusiast, understanding the basics of live edge woodworking techniques can open up a world of creative possibilities.
At its core, live edge slab milling is about transforming raw logs into usable slabs while maintaining their organic edges. This process is central to projects like dining tables, countertops, and other custom furniture pieces. Here’s why this method has captured the imagination of woodworkers everywhere:
Preservation of Natural Aesthetics: The bark, knots, and irregular shapes are retained, creating one-of-a-kind pieces.
Sustainability: By utilizing more of the tree, this process minimizes waste compared to traditional lumber production.
Versatility: Live edge slabs can be used in rustic, modern, or industrial designs, making them a favorite in interior decor.
Milling live edge slabs requires patience, skill, and the right tools. It’s not just about cutting wood; it’s about respecting the tree and turning it into something remarkable.
If you’re wondering how to mill live edge wood, the journey begins with selecting the right log and ends with a beautifully crafted slab ready for finishing. The process may seem daunting at first, but with the right guidance, anyone can give it a try. In the sections ahead, we’ll explore the tools, techniques, and steps needed to master this rewarding craft.
What is a Live Edge Slab?
A live edge slab is a piece of wood that keeps the natural edge of the tree it came from. Unlike regular lumber, which is cut into straight, uniform edges, live edge slabs preserve the organic shape of the tree’s outer edge, sometimes even including the bark. This creates a one-of-a-kind look that highlights the tree’s natural beauty.
Unique Features of Live Edge Slabs
Natural Edge: The edges often follow the original contours of the tree, giving each slab a unique, irregular outline.
Grain Patterns: Because these slabs are cut from the whole width of the tree, they showcase intricate grain patterns that are not always visible in standard lumber.
Bark Inclusion: Some slabs retain parts of the bark, adding texture and rustic charm.
Why They’re Popular
Live edge slabs are loved for their ability to bring a bit of nature indoors. They’re perfect for making:
Dining tables
Coffee tables
Shelving
Countertops
Wall art
A Quick Note: Each live edge slab is as unique as the tree it came from, making them a favorite for custom furniture projects. This individuality is what makes live edge pieces feel so special in any space.
Common Wood Types for Live Edge Slabs
Wood Type | Characteristics |
|---|---|
Black Walnut | Rich, dark tones with striking grain |
Maple | Light color, smooth grain |
Cherry | Warm reddish hues that darken over time |
Oak | Durable, with prominent grain patterns |
Hickory | Strong and varied grain, rustic appeal |
Live edge slabs are not just wood—they’re a story of the tree they came from. Whether you’re into modern, rustic, or industrial design, these slabs offer something that’s both functional and artistic.
Why Mill Your Own Live Edge Slab?
Milling your own live edge slab can be an incredibly rewarding experience. Whether you’re an experienced woodworker or just someone who loves working with natural materials, there are plenty of reasons to dive into this process. Here’s why you might want to consider it:
Unmatched Customization
When you mill your own slab, you get full control over the final product. From the type of wood to the dimensions and thickness, you can tailor every aspect to fit your specific project. This is especially important if you’re crafting something unique, like a live edge white oak dining table that complements your space perfectly.Cost Savings
Sure, the upfront investment in tools and equipment might seem steep, but over time, it pays off. Buying pre-milled live edge slabs can be expensive, especially for premium woods like walnut or oak. Milling your own allows you to work with locally sourced logs at a fraction of the cost.Sustainability
By sourcing your own logs, you can ensure you’re using wood that might otherwise go to waste. Maybe it’s a tree that came down in a storm or one removed during a landscaping project. Milling your own slabs gives new life to these materials.Personal Satisfaction
There’s something deeply satisfying about transforming a raw log into a finished piece of furniture. It’s a hands-on process that lets you connect with the material in a way that’s hard to replicate when buying pre-made slabs.
“When you mill your own live edge slab, the final product isn’t just furniture—it’s a story. Every grain, knot, and curve reflects your effort and creativity.”
Opportunity for Profit
If you’re skilled at the craft, milling live edge slabs can turn into a profitable side hustle. Many woodworkers sell their slabs to others who lack the tools or time to mill their own.Quality Assurance
When you handle the milling process yourself, you can ensure the slab meets your quality standards. You won’t have to rely on someone else’s work or worry about hidden defects.
In short, milling your own live edge slab offers a blend of creativity, practicality, and sustainability. It’s not just about saving money or customizing a piece; it’s about the joy of creation and the pride of knowing you made something truly unique.
Tools and Equipment Needed for Milling
Chainsaw
A chainsaw is the first tool you’ll need to start milling live edge slabs. It’s versatile and can handle rough cuts and initial shaping. Make sure to use a ripping chain specifically designed for cutting along the wood grain. This improves efficiency and reduces wear on the tool. If you’re just starting out, a mid-range chainsaw with a bar length of at least 20 inches should work fine. For larger logs, professional-grade chainsaws are recommended.
Slab Mill or Portable Sawmill
A slab mill or portable sawmill is essential for turning logs into usable slabs. These machines are designed to make precise, uniform cuts. While a portable chainsaw mill is a budget-friendly option, it may take more time and effort to set up and use. On the other hand, dedicated slab mills offer speed and precision but come with a higher price tag. Thin-kerf sawmills can also help you get more slabs from a single log by minimizing wood waste.
Safety Gear
Safety gear is non-negotiable. Milling involves heavy machinery and sharp tools, so protecting yourself is crucial. Here’s a list of must-have safety items:
Helmet with a face shield: Protects your head and eyes from flying debris.
Ear protection: Chainsaws and mills are noisy, so earmuffs or earplugs are a must.
Heavy-duty gloves: Provide a good grip and shield your hands from splinters.
Steel-toed boots: Keep your feet safe from falling logs or tools.
Chainsaw chaps: These can prevent serious leg injuries in case of an accidental slip.
Milling a live edge slab isn’t just about the tools; it’s about using them safely and effectively. Always double-check your equipment before starting.
Step-by-Step Process for Milling a Live Edge Slab
1. Selecting the Right Log
Choosing the right log is where it all begins. You’ll want to find a log that’s straight, free of excessive knots, and large enough for your desired slab dimensions. Logs from hardwood trees like walnut, oak, or maple are popular choices for milling natural wood slabs. Avoid logs with significant rot or insect damage, as they can compromise the slab’s integrity.
2. Preparing the Log for Milling
Before you start cutting, prep the log. This means removing dirt, bark, and any debris. A clean surface reduces wear on your tools and ensures smoother cuts. If the log is particularly large, consider trimming it down to a manageable length with a chainsaw. This is also a good time to inspect for hidden nails or screws—those can wreak havoc on your equipment.
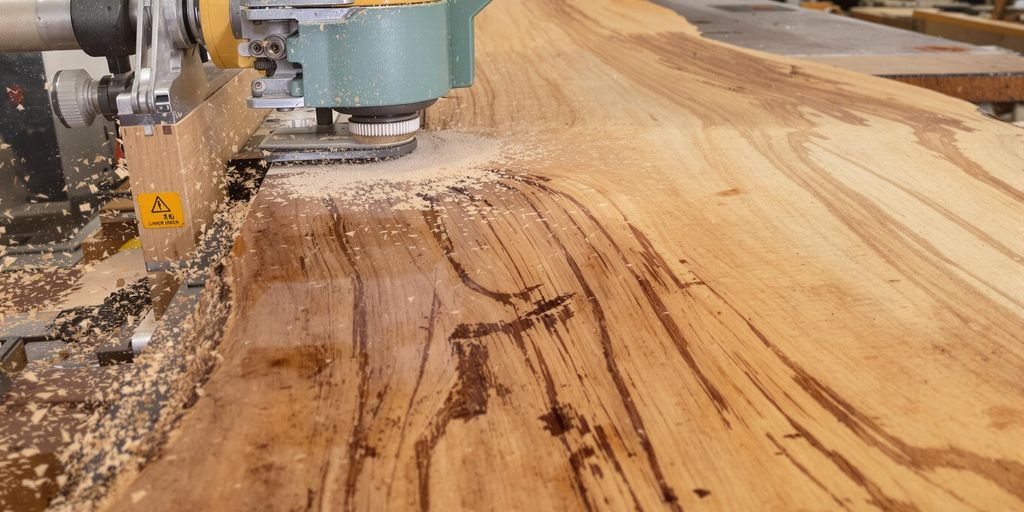
3. Setting Up the Milling Equipment
Now it’s time to set up your slab mill or portable sawmill. Ensure the equipment is on a stable, level surface. Attach guide rails if you’re using a chainsaw mill, and double-check that all components are secure. Safety gear—like gloves, goggles, and ear protection—is non-negotiable during wood slab processing.
4. Making the First Cut
The first cut is often the trickiest. Position the log so the blade can make a clean, straight pass. This initial cut removes the rounded top and creates a flat surface for subsequent cuts. Take your time here; a poorly executed first cut can throw off the entire process.
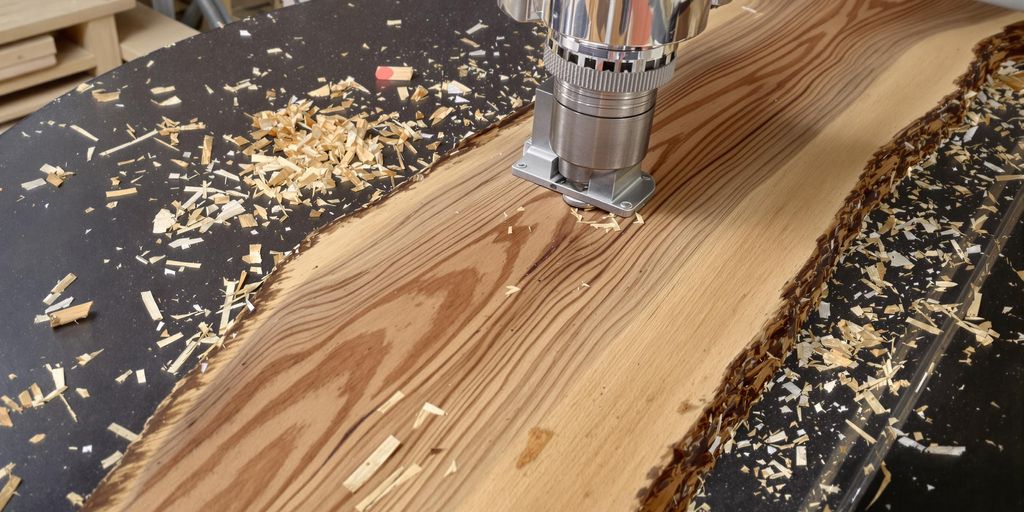
5. Repeating Cuts for Desired Thickness
With the top flattened, continue making parallel cuts to achieve your desired slab thickness. Most slabs range from 1.5 to 3 inches thick, but it depends on your project. Keep the log secured and adjust the mill’s settings as needed. For heavy slabs, you might need a forklift or additional hands to move them safely.
Milling live edge slabs is as much about patience as it is precision. Rushing the process can lead to uneven cuts or wasted wood, so take your time and enjoy the craft.
Drying and Curing the Slab
Drying and curing your live edge slab is a critical step to ensure it remains stable and durable over time. Properly dried wood is less likely to warp, crack, or harbor pests, making this process essential for a successful woodworking project.
Air-Drying vs. Kiln-Drying
There are two primary methods for drying wood: air-drying and kiln-drying. Each has its benefits and drawbacks:
Method | Timeframe | Moisture Content Goal | Pros | Cons |
|---|---|---|---|---|
Air-Drying | Months to years | 15-20% | Low cost, natural process | Takes a long time, weather-dependent |
Kiln-Drying | Weeks to months | 6-12% | Fast, kills pests, controlled process | Requires specialized equipment |
Preparing the Slab for Drying
Seal the Ends: Apply a wood sealer to the ends of your slab to prevent rapid moisture loss, which can lead to cracking.
Stack Properly: Use “stickers” (small wooden spacers) between slabs to allow airflow on all sides. This prevents uneven drying.
Choose the Right Location: For air-drying, pick a spot with good ventilation, consistent humidity, and protection from direct sunlight.
Monitoring Moisture Content
Invest in a moisture meter to track the drying progress. Aim for a moisture content of around 6-12% for indoor projects. For outdoor furniture, 15-20% may suffice.
Tips for Kiln-Drying
If you opt for kiln-drying, ensure the slab is heated gradually to avoid stress on the wood.
The process typically heats wood to 120-190°F to reach the desired moisture content.
Remember: A well-dried slab is the foundation of a strong, long-lasting piece of furniture. Rushing this step can lead to disappointing results later.
Common Mistakes to Avoid
Skipping the sealing step: This can lead to cracks and splits during drying.
Inconsistent airflow: Forgetting to use stickers or stacking improperly can cause warping.
Storing in unstable conditions: Avoid areas with fluctuating temperatures or humidity, like garages or sheds.
Sanding and Finishing the Slab
Sanding and finishing a live edge slab is the final step in transforming raw wood into a polished, usable piece. This process not only enhances the slab’s natural beauty but also protects it from environmental damage, ensuring it lasts for years to come. Below, we’ll walk through the key steps and considerations for sanding and finishing your slab.
Preparing the Slab for Sanding
Inspect the Surface: Before you begin, check the slab for any imperfections like cracks, knots, or uneven surfaces. You may need to fill gaps with epoxy or wood filler.
Flatten the Slab: Use a planer or router sled to ensure the slab is level. This step is crucial for achieving a smooth finish.
Clean the Surface: Remove any dust, dirt, or debris using a vacuum or a soft brush.
Sanding the Slab
Start with Coarse Grit: Begin sanding with a coarse grit sandpaper (e.g., 60-80 grit) to remove rough spots and tool marks.
Progress to Finer Grits: Gradually move to finer grits (120, 220, and up to 400, depending on the desired smoothness). Always sand along the grain of the wood.
Smooth the Edges: Pay special attention to the live edge. Hand-sand this area to maintain its natural contours while smoothing out sharp or rough spots.
Choosing the Right Finish
Oil Finishes: Enhance the natural grain and provide a subtle, matte look. Options include tung oil, Danish oil, and linseed oil.
Polyurethane: Offers a durable, glossy finish that’s ideal for high-traffic surfaces like tables.
Epoxy Resin: Creates a glass-like surface and is perfect for filling cracks or gaps.
Applying the Finish
Seal the Wood: Apply a wood sealer or a thin coat of your chosen finish to prevent uneven absorption.
Apply Multiple Coats: Use a brush or cloth to apply thin, even coats. Allow each coat to dry completely before sanding lightly with a fine grit sandpaper.
Final Buffing: Once the finish has cured, buff the surface with a soft cloth for a polished look.
Taking your time with sanding and finishing ensures the slab’s natural beauty shines through while also making it more durable. This step is where the wood truly comes to life, showcasing its unique grain patterns and textures.
Common Mistakes to Avoid
When milling live edge slabs, there are several pitfalls that can derail your project. Here are some common mistakes and how to sidestep them:
1. Storing Logs or Slabs in Unconditioned Spaces
One of the biggest mistakes is leaving your logs or slabs in a garage, shed, or outdoors without proper sealing. Wood is highly sensitive to moisture and temperature changes, which can lead to warping or cracking. Always store wood in a stable environment with consistent humidity and temperature.
2. Neglecting to Seal the Ends of the Log
Unsealed log ends lose moisture faster than the rest of the log, causing uneven drying and cracks. Use a proper wood sealer or wax on the ends immediately after cutting the log to prevent this.
3. Failing to Allow Proper Airflow
If you stack slabs directly on top of each other or lay them flat on a surface, airflow is restricted. This can lead to uneven drying and wood movement. Use spacers (often called “stickers”) between slabs to ensure air circulates evenly around all surfaces.
4. Skipping Safety Precautions
Operating a chainsaw or sawmill without the right safety gear is dangerous. Never skip wearing protective equipment like gloves, goggles, ear protection, and steel-toed boots. Safety first, always.
5. Rushing the Drying Process
Drying wood too quickly, such as using high heat or direct sunlight, can cause it to crack or split. Patience is key—air-dry the slabs slowly or use a kiln with controlled settings for best results.
6. Ignoring Equipment Maintenance
Dull blades, loose bolts, or poorly calibrated tools can ruin your cuts and even damage the wood. Regularly inspect and maintain your equipment to keep it in top condition.
7. Forgetting to Account for Wood Movement
Wood expands and contracts with changes in humidity. If you don’t allow for this movement in your design or storage, you may end up with warped or unusable slabs.
Avoiding these mistakes can save you time, money, and frustration. Take the time to properly prepare, and you’ll end up with beautiful slabs ready for your next project.
Tips for Maintaining Your Milling Equipment
Chainsaw
Clean the Chain Regularly: After every use, remove sawdust and debris from the chain to prevent buildup that can dull the blade.
Sharpen the Chain Frequently: A sharp chain cuts more efficiently and reduces strain on the motor.
Check Chain Tension: Ensure the chain is snug but not overly tight. Too much tension can cause wear, while too little can lead to dangerous kickbacks.
Slab Mill or Portable Sawmill
Inspect Blades: After each session, check for nicks or dullness. Replace or sharpen blades as needed.
Lubricate Moving Parts: Apply lubricant to tracks, bearings, and other moving components to prevent rust and ensure smooth operation.
Align the Mill: Periodically verify that the mill’s components are properly aligned to avoid uneven cuts.
Safety Gear
Wash and Inspect: Clean safety gear like gloves and goggles after every use to remove sawdust and resin.
Replace Worn Items: Torn gloves or scratched goggles should be replaced immediately to maintain protection.
Store Properly: Keep gear in a dry, clean area to prevent deterioration.
Keeping your equipment in top shape not only extends its lifespan but also ensures every slab you mill is precise and safe to handle.
Conclusion and Final Thoughts
Milling your own live edge slab can be a rewarding experience, offering both the satisfaction of craftsmanship and the ability to create something truly unique. Whether you’re a seasoned woodworker or just starting out, the process is as much about learning as it is about the end result.
Here are a few takeaways to keep in mind:
Start with the right tools and safety gear to ensure a smooth and secure process.
Take your time selecting the perfect log—it sets the foundation for your entire project.
Be patient with drying and curing. Properly dried wood is key to a durable, long-lasting slab.
Working with live edge slabs is about embracing the natural beauty of wood. Every knot, grain, and edge tells a story, making your finished piece one-of-a-kind.
Finally, remember to maintain your tools and equipment. A well-kept sawmill or chainsaw not only lasts longer but also produces cleaner, more precise cuts. With care and effort, your live edge slab project can transform into a stunning piece of furniture or art that lasts for generations.
Conclusion
Live edge slab milling is more than just a woodworking process—it’s a blend of skill, patience, and respect for the natural beauty of wood. From selecting the right log to the final cut, every step matters. Whether you’re a professional or a DIY enthusiast, the satisfaction of transforming raw timber into a one-of-a-kind piece is unmatched. It’s not just about creating furniture; it’s about crafting something that tells a story and stands the test of time. So, the next time you see a live edge table, remember the journey it took to get there—it’s a labor of love, precision, and creativity.
Frequently Asked Questions
What is a live edge slab?
A live edge slab is a piece of wood that keeps the natural edge of the tree it came from. Instead of straight, clean edges, it shows off the tree’s unique shape, curves, and sometimes even bark.
Why would someone mill their own live edge slab?
Milling your own live edge slab can save money, let you customize the size and style, and give you the satisfaction of creating something truly unique.
What tools are needed to mill a live edge slab?
You’ll need a chainsaw, a slab mill or portable sawmill, and safety gear like gloves, goggles, and ear protection.
How do you prepare a log for milling?
To prepare a log, you should remove any dirt, rocks, or loose bark. This helps protect your tools and ensures a cleaner cut.
How long does it take to dry a live edge slab?
Drying a live edge slab can take months to over a year, depending on its thickness. Proper air-drying or kiln-drying is essential to prevent cracking.
What are some common mistakes to avoid when milling?
Some common mistakes include using dull tools, not securing the log properly, and rushing the drying process, which can lead to warping or cracking.